Are you passionate about diy projects and want to turn it into a side hustle or full-time gig? Starting a diy blog is the way to go!
Successful diy bloggers are raking in thousands every month just by sharing their experiences. Why not join them?
In this post, I'll show you how to create a diy blog that engages readers and brings in money.
If you're ready to become a diy blogging pro, let's dive in!
Why You Can Trust Our DIY Blogging Guide
Lasso is installed on over 8,000 websites, including many diy blogs.
Our team has built multiple 7-figure blogs in a wide range of niches.
We have hands-on experience working with founders to grow and monetize their diy blogs.
DIY Blogging Basics
Starting a diy blog can be a really fun and rewarding experience, but it's important to know what you're getting into.
Here are a few basic things to keep in mind before diving in:
What Is a DIY Blog?
A DIY blog is a website where individuals share their do-it-yourself projects, ideas, tips, and tutorials. These blogs can cover a wide range of topics such as home improvement, crafts, cooking, gardening, and more. DIY bloggers often document their projects with step-by-step instructions, photos, and videos to inspire and guide their readers.
Readers visit DIY blogs to learn new skills, get creative ideas, and find solutions to their own projects. These blogs can be a valuable resource for anyone looking to save money, personalize their space, or simply enjoy a fun and rewarding hobby.
Why Should You Start a DIY Blog?
Starting a DIY blog can be a rewarding experience for those who have a passion for crafting, creating, and sharing their skills with others.
Here are a few reasons why you should consider starting a DIY blog:
- Share Your Creativity: Show off your unique projects and ideas to inspire others.
- Connect with Like-Minded Individuals: Build a community of fellow DIY enthusiasts who share your interests.
- Develop Your Skills: Constantly challenging yourself to create new content can help you grow as a crafter or artist.
- Potential to Earn Income: With enough traffic and engagement, you can monetize your blog through ads, sponsorships, or selling your creations.
Ready to kickstart your DIY blog? Get Your FREE 20-Page Guide To Making $1,000/Day.
Finding Your DIY Niche
You’re probably thinking, 'I already picked a niche! DIY' But for the purposes of blogging, that’s not nearly specific enough, at least in the beginning. If you want your blog to succeed, you need to niche down.
Why Choosing a Niche is Important
Choosing a diy niche is important for a number of reasons.
First, it makes it easier for readers to find your content and for search engines to rank it. If your blog is too broad, it will be hard to compete with other established diy bloggers and get organic traffic.
Second, having a specific niche will help you establish yourself as an expert in that area. Readers will come to trust your opinion and recommendations, and you'll be able to build a loyal following.
Finally, having a diy niche will also make it easier for you to come up with content ideas. Rather than trying to cover every aspect of diy, you can focus on the specific topics and recipes that your readers are most interested in.
How to Choose a DIY Blog Niche
Choosing a DIY blog niche can be overwhelming, but with the right approach, you can find the perfect fit for your interests and skills. Here are some tips to help you choose a DIY blog niche:
- Identify your passions: Consider what hobbies or activities you enjoy the most. Your blog niche should align with your interests to keep you motivated.
- Research trending topics: Look for popular DIY topics that have a large audience. This can help you attract more readers to your blog.
- Assess your skills: Choose a niche that showcases your expertise and allows you to provide valuable content to your audience.
- Consider audience demand: Think about what your target audience is looking for in a DIY blog. Choose a niche that meets their needs and interests.
- Explore different niches: Don't be afraid to try out different DIY niches to see what resonates with you and your audience. You can always pivot if needed.
We’ve written extensively about niche research for bloggers, but you should look for these qualities in your final choice:
- A mix of big and small competitors. If the niche doesn’t have big sites, there isn’t much money to be made. If there aren’t small sites, you won’t be able to compete.
- Income potential. A healthy mix of affiliate offers, display ads, and original products will allow you to diversify your income.
- Keywords and link-building opportunities. You’ll do more extensive keyword research later, so right now you’re just looking for content gaps. Are there keywords you could realistically rank for and get traffic early?
Popular DIY Blog Niches
DIY blogs are incredibly popular and cover a wide range of niches. Here are some of the most popular DIY blog niches:
- Home Decor: Tips and tutorials on decorating your home.
- Crafts: Creative projects for all skill levels.
- Fashion: DIY clothing, accessories, and style tips.
- Gardening: Advice on growing plants, flowers, and vegetables.
- Woodworking: Projects and techniques for woodworking enthusiasts.
Planning Out Your DIY Blog
So you've picked a niche for your blog, that's amazing! But don't forget,'failing to plan is planning to fail.'
Before you run off and start posting, let's take a moment to plan out your business strategy.
Set Your Blog Goals
Setting goals for your DIY blog is essential to its success. It gives you direction and helps you stay focused on what matters most.
When setting your goals, it's important to consider your audience, your niche, and what you realistically hope to achieve.
This can include things like increasing your readership, building your email list, or monetizing your blog.
By setting clear and achievable goals for your diy blog, you'll be able to create content that resonates with your audience, establish yourself as an authority in your niche, and achieve the success you're looking for.
Define Your Target Audience
Defining your target audience is crucial when starting a DIY blog. Here are some key points to consider:
- Identify your niche: Determine what specific DIY projects or topics you will focus on.
- Understand their demographics: Consider factors like age, gender, location, and interests of your target audience.
- Research their preferences: Find out what type of DIY content they enjoy consuming and what problems they need help solving.
- Engage with them: Interact with your target audience through social media, comments, and surveys to better understand their needs and preferences.
Do Your Keyword Research
Keyword research is an important aspect of creating content for your Food blog. It helps you understand the phrases and questions people use to search for information on the topic you're writing about. That way, you can use those phrases and questions to optimize your content for search engines.
Identify the keywords that are most relevant to your niche. These are your “seed keywords.”
Seed keywords are broad terms used to generate super-specific long-tail keywords.
- DIY home decor
- DIY crafts
- DIY woodworking projects
- DIY gardening
- DIY fashion
- DIY beauty products
- DIY organization ideas
- DIY home repairs
- DIY holiday decorations
- DIY gifts
Take your seed keywords and feed them into your keyword tool of choice. I like using Ahrefs.
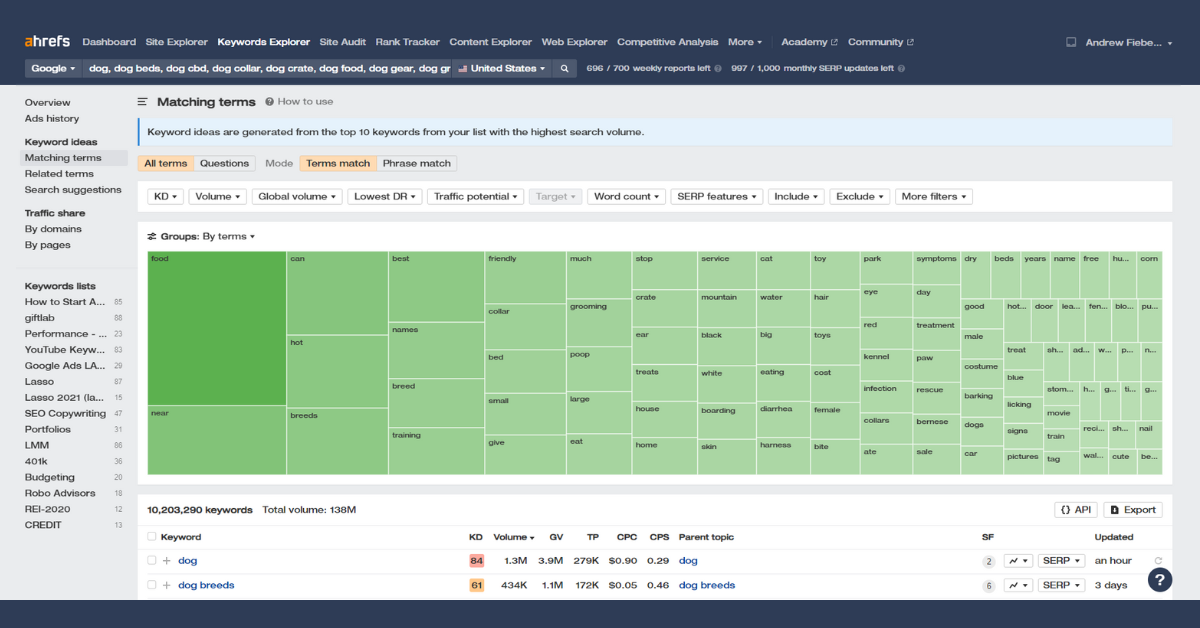
Add them to the report and hit search. Then, go to “Keyword Ideas” and click “Matching Terms.”
This list will contain thousands of possible terms for you to write about. I recommend targeting the lowest-volume keywords possible, no matter the traffic.
When you first start your diy blog, it’ll be hard to get traffic. But you can get it by targeting keywords that other site owners ignore.
TIP: When you first start your diy blog, focus on info content (question keywords). The content will be more helpful for your audience and less competitive since monetizing it is more challenging.
By doing your keyword research, you can improve your chances of ranking higher in search engine results pages and attracting more traffic to your Food blog.
Supercharge your earnings from day one. Lasso makes it easy to organize affiliate links make your first sales with conversion-optimized displays.
Don't wait for success; seize it with Lasso!
Learn MoreHow to Start a DIY Blog | Step-by-Step Guide
Now that you're done with the business plan, let's get to the fun part.
Here's how to start a DIY blog:
Step 1. Pick a Blogging Platform
Choosing the right blogging platform is crucial for the success of your DIY blog.
I strongly recommend building your blog with WordPress. It’s open-source, so your blog won't be dependent on a private company, and it’s fully customizable.
Some bloggers are intimidated by the number of features WordPress offers, but the best way to learn is just to jump in and start.
Here are some other options to consider:
- Blogger: A free platform owned by Google. Offers simple templates and easy integration with Google AdSense for monetization.
- Squarespace: A premium platform known for its design-centric approach. Offers visually appealing templates and in-depth customization options along with integrated eCommerce solutions for monetization.
- Wix: A free platform with a drag-and-drop website builder and customizable templates. Offers e-commerce options for selling products.
Consider the features, ease of use, and cost when choosing a platform that fits your needs. Each platform has its own strengths and weaknesses, so it's important to do your research before making a decision.
Step 2. Register a Domain Name
Registering a domain name gives your blog a unique online identity. When choosing a domain name for your diy blog, there are a few things to keep in mind:
- Make it easy to remember
- Keep it short and sweet
- Include your main keyword
- Avoid using numbers and hyphens
Also, please don’t create an exact-match domain name, like diyhomerenovationtips.com.
It’s limiting, has terrible branding potential, and just looks amateurish. You can do much better.
Instead, spend some time brainstorming diy blog names that have the following:
- A keyword related to your niche
- A feeling, emotion, or quality you want your website to communicate
- Three words or less
So, instead of the example used above, you could use one of these:
- CraftyJoy.com
- DIYBliss.com
- HomeMakeover.com
- CreativeThrills.com
- HandyHappiness.com
All of those are available at the time I’m writing this, and all would be easy to build a brand around (not to mention better for Search Engine Optimization or SEO).
You can also use a domain name generator tool for inspiration.
Once you have a few ideas for a domain name, you can check if they are available using a domain registrar.
Many services can help you register a domain name, but I recommend getting one from your hosting provider. (They usually include a free domain name when you buy hosting.)
When you find the perfect domain name, register it right away before someone else takes it.
Step 3. Secure Reliable Hosting
Once you’ve chosen a domain name, you have to purchase website hosting to make your diy blog accessible online. (As I mentioned earlier, you can usually purchase both simultaneously.)
Website hosting is a service that allows your website to be stored on a server and accessed by Internet users.
CAUTION: I recommend staying away from Godaddy. They have awful customer service and a history of alleged predatory behavior
Here are some popular website hosts for diy blogs:
- WP Engine: I host all my sites with WP Engine. It's lightning quick and super easy to use. I've tried almost every shared hosting provider, and WP Engine is by far the best.
- Kinsta: A premium hosting provider known for its high performance and managed WordPress hosting solutions.
- Hostgator: A popular host that offers affordable pricing and easy WordPress integration.
After you’ve chosen and registered your domain (following the instructions from your hosting company), you’re ready to install WordPress and start building your site.
Step 4. Install WordPress
The first step to setting up your diy site is to install WordPress.
NOTE: WordPress is an open-source software found on WordPress.org. WordPress.com is a premium blogging platform, but you never need to pay to install WordPress on your website, even if it’s self-hosted.
Any legitimate host these days will offer automated WordPress installation with the click of a button. Follow their instructions, and reach out to their support if you get stuck.
Once you’ve installed WordPress, go to your WordPress Admin Dashboard and start customizing your site.
TIP: You can find your dashboard login page at yoursite.com/wp-admin
Step 5. Pick a Theme for Your DIY Blog
When choosing a theme for your website, it's essential to consider your niche and target audience. Your theme should reflect your content's style and tone while being visually appealing and easy to navigate.
There are thousands of themes available to choose from, both free and paid. These are the free themes I recommend for new bloggers:
- GeneratePress - GeneratePress is one of the most popular WordPress themes on the market. It's lean, fast, and easy to customize. There's free and paid versions available.
- Kadence - Kadence is an extremely fast and lightweight theme, with a wide range of free customizations, although it does fall behind in updates from time to time.
- Astra - Astra is a simple WordPress theme that makes designing a website easy. It makes it easy to create a stunning niche website without all the fluff.
You could also buy a premium theme, but free themes are fine in the beginning.
Step 6. Install Essential Plugins
A lot of people are afraid of plugins because they think more plugins will slow their site down.
However, any good plugin these days is built for speed, so you shouldn’t worry too much about it.
If you’re still worried about site speed, our Cloudflare review shows how to perfect it.
To install a new plugin, click on “Plugins” in your WordPress dashboard sidebar. Then, click on “Add New” and either upload a plugin ZIP file or search for free plugins in the WordPress Plugin Repository.
Here are a few plugins that I recommend for every new DIY blog:
- Lasso Lite - The best way to insert product displays and affiliate links into your content is to use Lasso. Lasso Lite is the free version of Lasso and is great for new sites.
- Cloudflare - I recommend the paid Cloudflare plan, but even the free CDN will do wonders for your site speed.
- Imagify – Big images are the biggest thing that slows down websites, and an image optimization plugin like Imagify fixes them instantly.
- RankMath – RankMath is my favorite SEO plugin, but you could also use Yoast SEO or All-In-One SEO. SEO plugins provide guidelines rather than done-for-you solutions.
Now that you’ve installed and set up WordPress and your plugins, it’s time for some branding.
Step 7. Design Your Site
I’m not a web designer, but here are a few guidelines for beginners to create a professional-looking site:
- Use two colors: You only need two colors for your brand, a primary and an emphasis color. The emphasis color should contrast your primary color and only be used for CTA buttons. I use Coolors to quickly find a color palette that works for me.
- Use one or two fonts: You don’t want to overwhelm your audience. A tried and true technique is to use one font for your headings and one for your body text. It also helps to have one serif font and one sans serif font, so they stand apart. Fontpair is a great tool for this.
- Start with a text logo: Too many marketers get hung up on details like logos. You don’t even know what your site is going to be yet. Give your brand time to develop by starting with a simple text logo.
Don’t worry too much about your site’s design in the early stages. You can change all this stuff later when sales start coming in.
Step 8. Set Up Your Basic Blog Pages
You'll need to create a few key pages before you can start publishing awesome DIY content.
The first page is your homepage, which should introduce your blog and give readers an idea of what they can expect to find on your site.
You should also create an "About" page, which provides more information about you and your blog. This is a great place to share your story and give readers a sense of your personality.
Another important page is the "Contact" page, which makes it easy for readers to get in touch with you. You can include a simple contact form or provide your email address and social media links.
You can create these pages by using your blogging platform's built-in categories or by creating custom pages that link to your posts.
By providing readers with clear navigation and easy access to your content, you'll be on your way to building a loyal following.
Step 9. Write Your First Blog Posts
Once you've set up your blog and have a clear idea of what you want to write about, it's time to start publishing your first blog posts.
Here are some tips to get you started:
- Choose a topic you're passionate about and that your audience will find interesting. Research what's already out there and offer a fresh perspective or unique insights.
- Plan out your post by creating an outline or mind map. This will help you stay focused and ensure that your post flows logically.
- Write your post in a conversational tone and avoid using jargon or overly technical language. Use short paragraphs and sentences to make your post easy to read and scan.
- Include images or other media to break up the text and make your post more visually appealing.
- Use subheadings and bullet points to organize your content and make it easier to read.
- Edit your post carefully for grammar, spelling, and punctuation errors. Read it aloud to ensure it sounds natural and flows well.
- Once you're happy with your post, hit the publish button! Share it on social media and other channels to get it to as many people as possible.
Get our FREE toolkit and checklist for writing articles that convert.
How to Write Great DIY Blog Posts
Now that you officially have a site, it’s time to fill it with top-notch content.
You won’t get really good at it until you’ve done it for a while, so it’s best to write as much as possible in the early days
Here’s how to publish better diy articles from day one.
Brainstorm Ideas
Coming up with great blog post ideas based on your niche and your audience's needs can be very tough.
What I like to do is start by writing word clouds with pen and paper. It helps me quickly move from one topic to the next without thinking about it.
Once I have a good list of topics, I organize the keywords and put them into Ahrefs. Then I prioritize my content production based on what I think I have the best chance of ranking for (and what sounds like the most fun to write about).
Build a Solid Framework
Before I ever write a blog post, I build an outline using Dynalist.
I look at what competitors have published for my keyword, write down my version of the headings, and move the structure around until the flow makes sense.
Not only does this give me a solid foundation to build my article upon, but it helps me pace my article. If I’ve written 300 words under an H3 heading, I need to wrap it up and move on to the next point.
If you establish solid guidelines, your posts will practically write themselves.
Write Without Stopping
Once you have an outline of where you want your article to go, it’s time to just sit down and write.
I like to shut out any distractions and write in silence, or put on very quiet music. It’s insane how quickly you can write when you don’t have anything else to think about.
You shouldn’t even care about quality when writing your first draft. Just get your words down on paper.
Once you’re finished, step away for a bit, then come back and start editing. Correct any grammar mistakes and make sure your ideas make sense (it helps to read the content out loud).
TIP: I use Grammarly Pro to speed up the editing process for all my content. It’s probably the most valuable tool I use (aside from Lasso, of course 😉).
Optimize Your Content for On-Page SEO
Search engine optimization (SEO) is the process of optimizing your content to rank higher in search engine results.
Make sure you do these things when writing your diy blog posts:
- Properly structure your headings. Headings are like a map that search engines like Google use to decipher what your content is about. Make sure your headings make sense (nest smaller ideas under larger ideas), and that you’ve included keywords.
- Use your target keyword naturally and often. It’s common knowledge that keyword stuffing doesn’t work anymore, but it’s still important to use your target keyword often. It will help your readers stay on track and help search engines better understand what you’re talking about.
- Add Photos and Videos. Images and videos increase the time readers spend on your page. That signals to Google that your article fits what readers are looking for. They also break up a post and allow your readers to breathe before reading the rest of the article.
- Promote the post immediately after publishing. There’s some disagreement about whether traffic is a ranking factor, but I’ve definitely had faster rankings when I got early traffic to my blog posts. And, if you have a mailing list, your subscribers want to know about your content anyway!
Use AI to Speed Things Up
At the time I'm writing this, AI still isn't able to replace a skilled, knowledgable writer.
But it's getting really close.
As AI tools continue to improve, you're going to find more and more content online that's produced without a human writer. And that content will rank in Google. There's no consolation prize for human-written content.
For the time being, here's my advice; use AI to write the first draft of your content. Then edit it thoroughly before publishing.
To get the best AI content out of the gate, I recommend Copy.AI.
Out of all the AI writing tools I've tested (which is a lot), Copy.AI produces the best, most natural content, and also has the most reasonable pricing.
Promoting Your DIY Blog
Once you publish a blog post, you need to promote it.
Seriously, most diy bloggers post and pray. If you use even one of these promotional methods, you’re doing more than 99% of the competition.
Make the Most of Social Media
Social media and blogging go hand-in-hand. Social media can be a game changer, especially in the diy niche, where readers care about the person behind the blog.
I don’t recommend spending all day on Twitter, but comment on popular threads, respond to outreach and share helpful things.
Also, shout out when you have a new blog post! Your followers want to know when you put out new content.
Build an Email List for DIY Enthusiasts
There’s a reason why email marketing is the only form of online marketing that’s barely changed in the past 15 years. It works.
It’s also challenging. Most diy blogs ask readers to join their mailing lists, so give them a special reason to sign up for yours.
It could be a workout plan, equipment guide, or anything else that sets you apart from other diy bloggers.
Why go through all this headache? Because anyone who signs up for your mailing list is devoted to what you have to say. These people are your congregation.
If you recommend a product to your mailing list, they’ll likely purchase it. At a bare minimum, send your new blog posts to your mailing list to pump up early traffic numbers.
Be ethical, but find things your mailing list will appreciate and sell, sell, sell!
TIP: You can find a bunch of premium sales email templates on Canva. Work smarter, not harder!
Collaborate with Other DIY Bloggers
As website owners, we tend to think of our competitors as enemies, which is a bit silly. When you think about it, they’re just like us, trying their best to hustle and make things work.
Instead of worrying about how other diy bloggers will outrank you, reach out and see if you can work together.
If you build a network of small diy bloggers who all promote each other’s content, you’ll stand a much better chance of competing with established diy authorities.
Engaging in DIY Communities
Join online communities related to your niche and engage with other members. This will help you establish yourself as an expert and build relationships with potential readers.
Monetizing Your DIY Blog
Ok, so your blog is up and running, and you're gaining a following. How do you monetize a diy blog?
Here are the best ways to earn a real income from your new diy blog.
Affiliate Marketing
I recommend diy bloggers start with affiliate marketing before any other monetization method.
I love affiliate marketing because it’s a low-effort way to monetize your website without ruining your reader’s experience.
To monetize your diy blog with affiliate marketing, first, you have to identify products your audience will find helpful. Then, find the affiliate program for those products, and write thorough product reviews.
For beginners, I recommend focusing on the Amazon Associates affiliate program. The conversion rate is incredible, and you can diversify when your site is more successful.
For products that aren’t available on Amazon, just do a Google search for “[Product] affiliate program,” and you’ll find their program’s signup page.
Another way to find affiliate programs is by checking Lasso's database.
To save you some time, here are a few of the best affiliate networks for diy bloggers:
-
Commission Rate: Varies
Cookie Duration: Varies
Grantoro is a worldwide performance marketing agency that unites affiliates and direct advertisers on a way of growth.
-
Commission Rate: Unknown
Cookie Duration: 30 Days
Customer Direct Group is a user acquisition agency that combines top of the line technology with the latest marketing techniques to help grow your business.
-
Commission Rate: $10 - $25 Per Sale
Cookie Duration: 45 Days
With Handy you can signup for handy-man type work around your neighborhood. Have free time on a Saturday? Install someone’s ceiling fan. Like that.
TIP: We maintain a database of the best affiliate programs. Click here to see the best home improvement affiliate programs.
Once approved for your chosen affiliate program, add your affiliate link to products and images, and you’re good to go. You’ll earn a commission if a reader clicks on your link and makes a purchase.
If you're still wondering how to earn money with affiliate marketing, check out these affiliate marketing website examples for inspiration.
Earn More Affiliate Income With Lasso
If you want to take your affiliate marketing strategy to the next level, I recommend you sign up for Lasso.
Lasso is a WordPress plugin that helps affiliate marketers manage links and create product displays that convert.
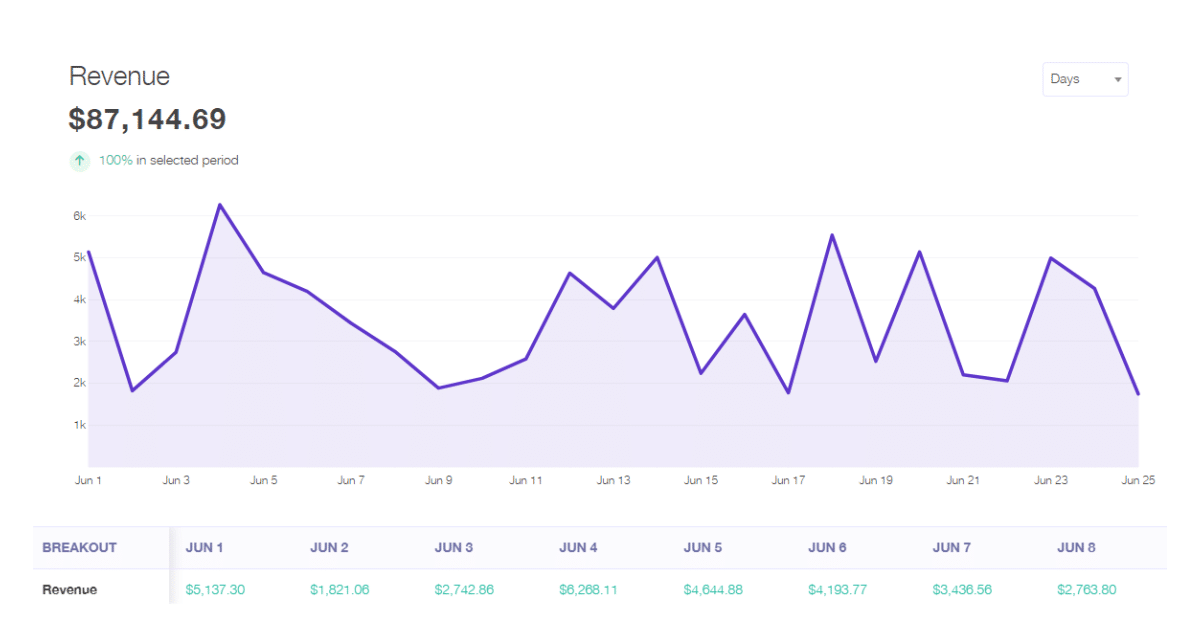
All you need to do is paste the affiliate link in your Lasso dashboard, add some interesting sales copy, and you’re ready to insert that Display into your blog posts.
Your product displays could look like this one:
Lasso is the best WordPress plugin for affiliate marketing. If you want to earn more affiliate income and grow your niche site, you need Lasso!
Great Displays Increase Conversions!
If you ever need to change the link, you can change it once in your Lasso dashboard, which will update the link across your entire website.
Lasso will also handle your link cloaking and attributes, so your site will always be optimized and compliant.
That’s not even mentioning things like Tables, Grids, Lists, Link Alerts, and more.
|
Our Pick

|

|
Budget Pick

|
|
4.8
|
4.6
|
3.7
|
|
Starting at $30 a month
|
Starting at $30 a month
|
Starting at $2.75 a month
|
If you want to monetize your diy blog the easy way, sign up for Lasso today.
Display Ads
Another great way to monetize your diy blog is with display ads. Display ads use cookies to advertise products your readers will love, so it’s a very individualized experience.
Display ads are also the most passive way to monetize a diy blog. You turn them on, configure the settings, and wait for the money to roll in.
The drawback to display ads is that nobody likes them. It’s why so many people install ad blockers in their browsers (which stop you from making money, by the way).
TIP: If you use display ads on your diy blog, configure the settings to prioritize user experience. By being selective with your ad placements, you’ll make more money in the long run.
Here are the best ad networks to join based on your site’s page views:
- 50,000+ Visitors per month - Mediavine
- 10,000-50,000 Visitors per month - Ezoic
- <10,000 Visitors per month - Google Adsense / waiting to grow
NOTE: With the low rates ad networks pay, it won’t be worth running display ads if you have less than 10,000 monthly visitors. You’re better off focusing on affiliate offers and creating more content to grow your following.
Digital Products
Selling digital products is the easiest way to transition from advertising other people’s products to selling your own.
That’s a great step to take because it means instead of earning 3-8% of the profit, you’re taking 100% of the profit.
The drawback to selling anything is that you’re responsible for the bulk of the work. You need to provide customer service, handle returns, and find a way to process payments and distribute products.
High-Potential Digital Products in the DIY Blog Niche:
- Printable planners and organizers: These can help DIY enthusiasts stay organized and plan their projects effectively.
- Online courses and tutorials: Offering in-depth guides on various DIY projects can attract a loyal following.
- Ebooks with DIY tips and tricks: Providing valuable information in a convenient digital format can be a hit among DIY enthusiasts.
- Exclusive access to video tutorials: Offering premium content with step-by-step video guides can be a great source of revenue.
- Digital templates for DIY projects: Providing customizable templates can save time and effort for DIY enthusiasts.
Once you’ve created a digital product, connect a payment processor like Paypal or Stripe to your site with a plugin like Woocommerce.
Then you can use a tool like ConvertKit to automatically email the lead magnet to customers after they’ve finished checking out.
It’s a lot of work, but the extra profit is well worth it.
Consulting
Are you a DIY pro? Consider offering consulting services on your blog! Share your valuable knowledge with your readers for a fee. As your audience grows, they'll likely reach out for help with specific projects. Offer them your expertise for $100 per hour. It's a win-win situation!
If you find you’re selling a lot of consulting services, you can even create a section of your site dedicated to your services.
TIP: You can use Lasso to increase your consulting sales. Set the destination link to your contact page, and you’re all set!
FAQs on Starting a DIY Blog
How Much Money Do DIY Bloggers Make?
The income range for diy bloggers is enormous. Many bloggers make no revenue, while some diy blogs make over six figures per month. It all depends on traffic and how well you present your offers.
How Can I Monetize a DIY Blog?
The best way to monetize a diy blog is with affiliate marketing, but you can also use display ads, sell digital downloads, or even sell coaching services.
How Do DIY Bloggers Get Paid?
Most diy bloggers make money through affiliate commissions and advertising fees. Both of these monetization methods pay out one or two months after the fees have been generated.
Some diy bloggers also sell sponsored posts, consulting services, or their own products. In these cases, a payment processor like PayPal or Stripe is necessary.
Is DIY Blogging Easy?
Nothing worth doing is truly easy, but that doesn’t mean diy blogging isn’t fun.
As a diy blogger, you’ll get to go places, try new things, and meet new people. And it will be part of your business! What could be cooler than that?
Is It Worth Starting A DIY Blog?
It’s absolutely worth it to start a diy blog. Not only can you make a living from it, but you can also build a community and control the conversation.
Once you’re an established authority, people in diy-related industries will take you seriously.
Final Thoughts on Starting a DIY Blog
So there you have it, my advice for anyone thinking about starting a diy blog.
It's a tough industry out there. Some people don't see any profits for months or even years. It can be a bit of a financial gamble at first. But trust me, it's all worth it in the end.
If you dream of being a successful diy blogger, just stick to the tips in this article, keep at it, and write the kind of content you'd enjoy reading. It's not easy, but it is possible.
Don't forget to be consistent, interact with your audience, and most importantly, have fun with it!
Why You Should Trust Our DIY Blogging Content
You may be thinking, "that's all great, but what does Lasso know about diy blogging?"
Quite a lot, actually.
Here's why you can trust our process for building a successful diy blog:
We've Built Wildly Successful Blogs
Lasso is built for affiliate marketers, by affiliate marketers. We're not gurus; we've walked the walk.
Our team members have built multiple blogs from the ground up, some of them earning over seven figures in revenue.
We put that experience into every guide we write, so you can trust we're giving you a process that works.
We Talk To DIY Bloggers Every Day
Lasso's WordPress plugin is installed on over 8,000 websites, including a lot of diy blogs.
Our team supports those bloggers every day as they create awesome content and earn lots of money.
These communications give us a bird's-eye view of what's new in the diy industry. We take that information and use it to keep these guides as up-to-date and accurate as possible.
We're Super Nerds
We've put a lot of company focus into learning everything we can about blogging, affiliate marketing, SEO, and anything to do with online entrepreneurship.
We attend conferences, collect high-level contacts, read tons of books, and distill all of that information into our content. We pass information onto you that was previously only available to industry insiders.